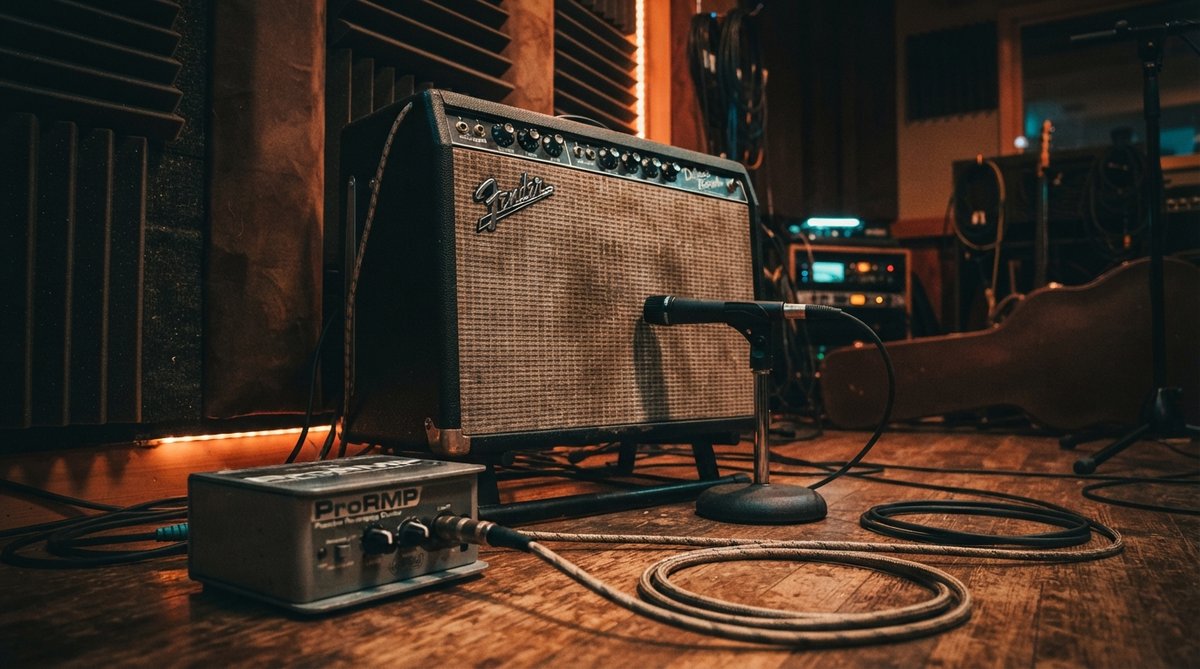
What is Re-amping?
At its core, re-amping involves taking a pre-recorded, clean audio signal (often a 'DI' or 'Direct Input' track) and sending it out of your audio interface, through an amplifier, pedal, or other external processing, and then recording the output back into your DAW. This means you can capture a performance once and then endlessly experiment with its tone without needing the performer present.
Why Re-amp? The Creative Advantages
The primary benefit of re-amping is flexibility. Imagine you've recorded a guitar part, but later decide the amp tone isn't quite right. Instead of re-recording the entire take, you can simply re-amp the clean DI. This allows you to audition different amplifiers, speaker cabinets, microphones, and even room acoustics, finding the perfect sound for your mix. It's also invaluable for sound design, letting you push instruments through unexpected signal chains.
Re-amping separates performance from tone, giving you endless sonic possibilities after the fact.
Re-amping Guitars: Classic and Beyond
Guitars are perhaps the most common instrument for re-amping. Recording a clean DI of your guitar allows you to later run it through a variety of physical amps and pedals. This is perfect for trying out different overdrive characteristics, from a subtle bluesy crunch to a full-on saturated fuzz. For example, you could record a clean DI, then experiment by running it through a classic British blues overdrive like our Schulz Tonebreaker plugin, or push it to the limits with the gritty tones of the Schulz PortaCrunch 424 which emulates a legendary cassette preamp. Remember to also experiment with microphone placement and different rooms to capture unique ambiences. You can learn more about crafting specific guitar tones in articles like Crafting The Classic British Blues Guitar Tone In Your Daw or Crafting Iconic 90S Indie Guitar Tones In Your Home Studio.
Re-amping Bass: Adding Weight and Character
Bass benefits greatly from re-amping. Often, engineers will record a clean DI bass signal alongside a miked amp signal. Re-amping the DI provides a third, highly flexible option. You can send the clean bass through a different bass amp for more warmth, drive, or punch. Blending this re-amped signal with the original DI can create a massive, detailed bass tone, combining the clarity of the direct signal with the character of the amplifier. Explore more about bass tone in Crafting Punchy And Clear Basslines.
Re-amping Vocals and Other Instruments: Unexpected Textures
Don't limit re-amping to just guitars and bass. Sending vocals through a small guitar amp can add a gritty, lo-fi character that's hard to achieve with plugins alone. Similarly, drums, synthesizers, or even entire mixes can be re-amped through guitar pedals, spring reverbs, or unique acoustic spaces to create unconventional textures and atmospheres. Imagine running a synth pad through a vintage tape delay or a vocal through an old, characterful tube preamp.
Studio Setup for Re-amping
To re-amp, you'll need a few key components: an audio interface with available outputs and inputs, an external amplifier or effect pedal, a microphone (if using an amp), and crucially, a re-amp box. A re-amp box converts the balanced, line-level signal from your interface to an unbalanced, instrument-level signal, matching the impedance required by guitar amps and pedals. This prevents signal loss and impedance mismatches. Always start by recording a clean, high-quality DI signal of your instrument.
A clean, well-recorded DI track is the foundation for any successful re-amping adventure.
Leveraging Plugins in Your Re-amp Chain
Plugins play a vital role both before and after the physical re-amping process. Before sending your DI signal out, you might use an EQ or a subtle compressor to shape the tone. After capturing the re-amped signal, you can further refine it. For spatial effects, consider our RedVerb 2 for versatile convolution reverb, allowing you to load custom impulse responses to place your re-amped sound in virtually any space. If you're after a classic 80s digital vibe, the JP-ME-1 offers iconic sounds with a simple interface. Visualizing your signal is also key: use Oszillos Mega Scope to monitor waveforms and phase relationships, or Spectrum 2 to analyze frequency content before and after re-amping, ensuring your tones sit well in the mix. These visual tools, also available in the Oszillos & Spectrum Bundle, help you make informed decisions. You can learn more about these tools in Oszillos Mega Scope Multi Channel Audio Oscilloscope Plug In and Spectrum 2 The Ultimate Multi Channel Spectrum Analyser Plug In.
To add extra width and movement to your re-amped tracks, especially on guitars or synths, try the lush analog tones of our JUNI 1984 CHORUS. For enhancing the punch, clarity, and impact of your re-amped sounds, OOMPH is a multi-band dynamic enhancement plugin that lets you independently enhance frequency zones, controlling saturation, balance, dynamics, and stereo width. This is particularly useful when blending multiple re-amped signals.
Tips for Successful Re-amping
- Record a Great DI: Ensure your initial DI recording is clean, free of clipping, and has good gain staging. You can always process it later, but a poor source will yield poor results. Learn more about The Art Of Mastering Gain Staging Keeping Your Signal Clean.
- Check Phase: When blending re-amped signals with original DIs or other miked tracks, always check for phase issues. Even small phase discrepancies can thin out your sound. The Oszillos Mega Scope can be very helpful here for visual inspection. Our article on The Power Of Phase Understanding And Manipulating Phase In Your Mix offers deeper insights.
- Experiment with Mic Placement: Just like recording a live amp, the microphone's position relative to the speaker makes a huge difference in the re-amped tone. Don't be afraid to move it around.
- Blend Signals: Often, the magic of re-amping comes from blending the re-amped signal with the original clean DI or other processed versions. This allows for a rich, complex sound.
- Monitor Levels: Pay attention to input and output levels throughout the chain to avoid clipping or excessive noise.