Oszillos Mega Scope Manual
Contents
- FAQ
- Introduction
- Downloading the Plugin
- Plugin Installation
- License Management & Activation
- Basic Operation
- Example Setup
- Naming, coloring, and re-ordering tracks
- Hiding Tracks
- Grouping Tracks
- Side Chain Input
- Settings and Top Bar
- Presets
- Color Selector
- Colour Themes
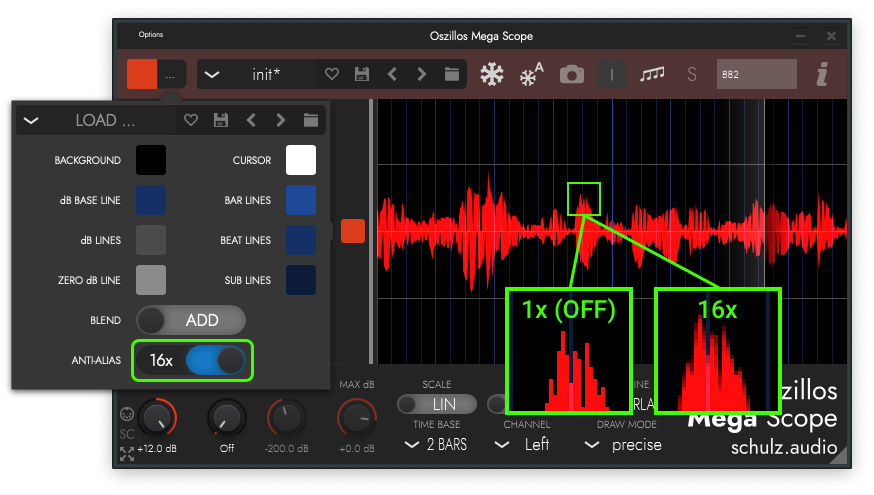
- Anti-Aliasing
- Draw Mode Selector
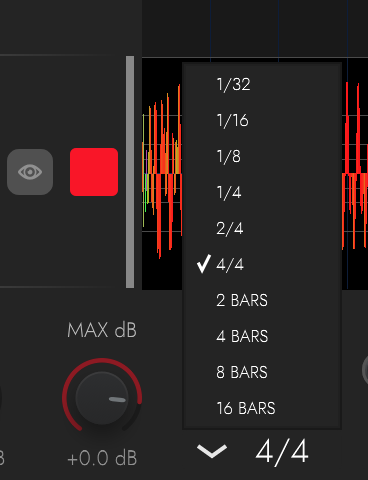
- Beats to Show (Display Length)
- Channel
- Gain
- Logarithmic (Decibel) Scale
- Draw Waves ...
- Continous Scroll
- Freeze
- Screenshot
- Straight / Tripplet Grid
- Solo
- Latency Compensation
- Semi-Automatic Latency Compensation
- Latency detection & Track Delay
- Info
- Mouse Drag Measuring
- Conclusion
1. FAQ
Q: When I adjust the level of my track, Oszillos Mega Scope doesn't show the change.
A: Your tracks volume fader is applied AFTER Oszillos Mega Scope, so OMS doesn't see the adjusted signal. In Ableton Live you can group your track by hitting CMD+G (CTRL+G on Windows) and put the scope onto the group. When you then adjust the volume of the inner track, OMS will see the change.
Q: I see a second track is Oszillos Mega Scope, even though I only have one instance. Why is that ?
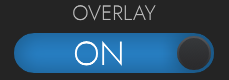
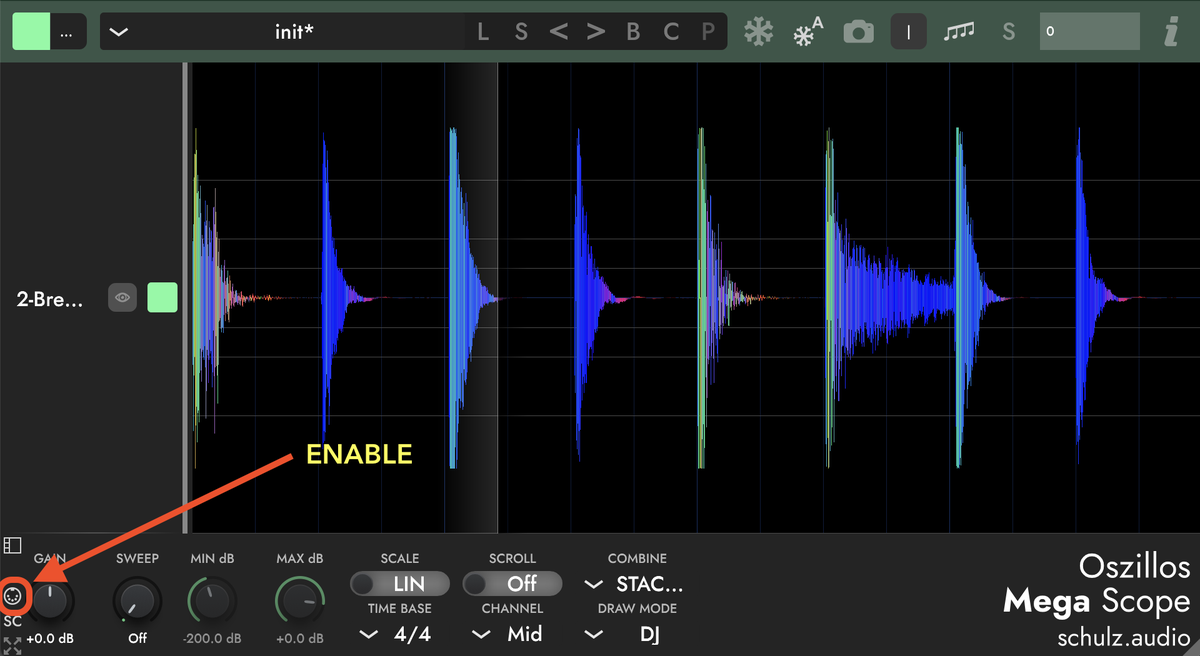
A: Oszillos Mega Scope has a side-chain input which let's you work around latency compensation issues of various DAWs. You can hide the side-chain by clicking the "SC" button at the bottom-left corner of the plug-in window.
Q: I don't see a waveform, just a small section is displayed, what's going on.
A: This is most likely caused by tempo automation. OMS predicts where the case is going to be the next time around - if it diverges too much, it discards the data to avoid incorrect display. For displaying the data correctly when the tempo is constantly changing, we would have to stretch the data - maybe in the future.
Q: I loaded multiple instances, but they don't see each other - why ?
A: This is most likely caused by plug-in isolation and frequently happens in BitWig - luckily there's a simple solution.
2. Introduction
Oszillos Mega Scope is a beat-synced multichannel oscilloscope audio plugin, providing accurate and robust audio analysis simultaneously across independent channels.
Oszillos is available in all major plugin formats (AU, VST, AAX), and as a standalone version.
Try it yourself by downloading the free trial, or purchasing the full license from the Product Page.
In addition to this guide, you can hover over the UI elements within the plugin, to display a tooltip with helpful information.
This manual helps you get the most from Oszillos and is split into two sections.
- Setup Steps
- Main Features.
Setup Steps
3. Downloading the Plugin
Both plugin and standalone versions are downloaded as either a .pkg file for macOS or a .exe installer for Windows.
You can find the download links on the product page.
Both the trial and full version use the same installers - although the trial has a time limit.
Purchasing a full license removes the trial’s time limit.
4. Plugin Installation
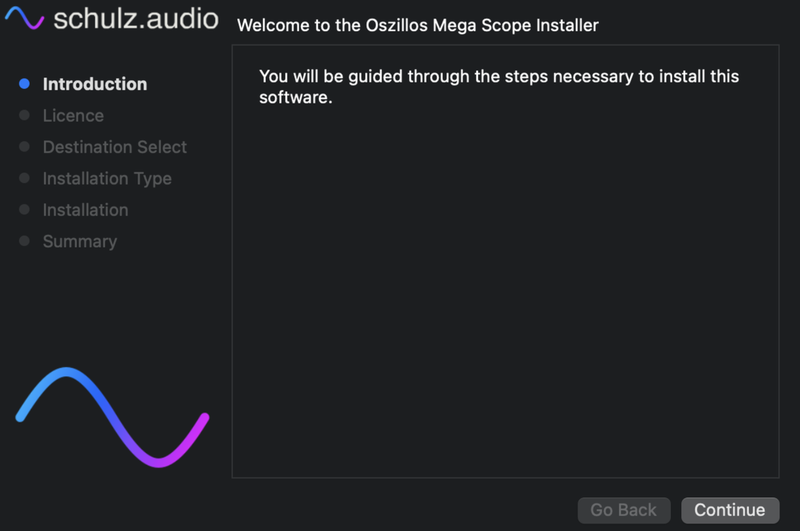
After downloading, install the plugin by running the installer and following the wizard.
Ensure you install the plugin to the correct VST folder directory. Otherwise, you need to redirect your DAW to search for the correct location.
Installation Notes
- On Windows, it is recommended to uninstall the older version via “add/remove programs” before installing the new file.
- Close your DAW before uninstalling or re-installing.
5. License Management & Activation
You will be prompted to verify your license after running the plugin for the first time.
For more information on this process, see our resource on License Management.
Main Features and Functions
6. Basic Operation
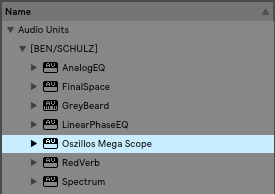
After installing Oszillos Mega Scope, launch your DAW and re-scan your plugin folders to locate the new plugin.
If everything worked, Oszillos Mega Scope should appear in your DAW’s plugin list.
First, insert an instance of Oszillos Mega Scope at each point of the signal chain you want to analyze.
All instances will display the audio signals that are being monitored by other instances of the plugins, creating a revolutionary multi-source analysis tool.
That's our zero-routing technology doing its job.
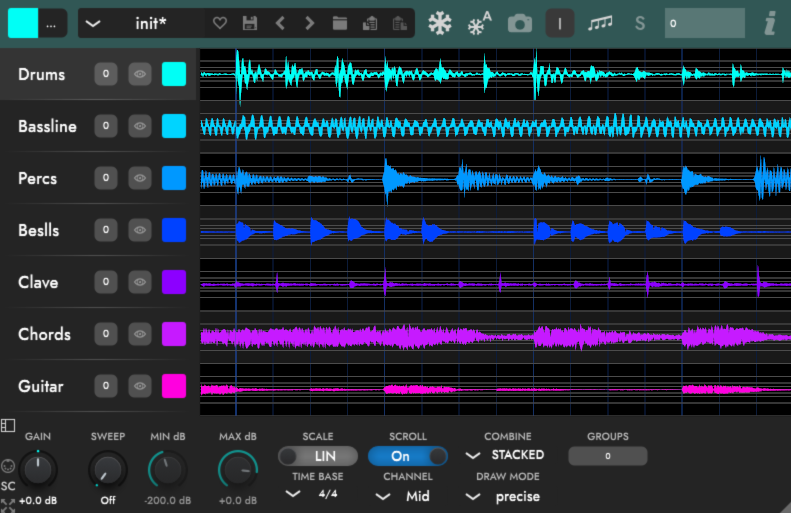
7. Example Setup
Put one Oszillos instance on your kick-drum track, a second on your snare track, and a third on the hi-hat track.
Play your track, and the result should look something like this:
You will be able to see how each instance of the plugin detects the others and displays the monitored waveform.
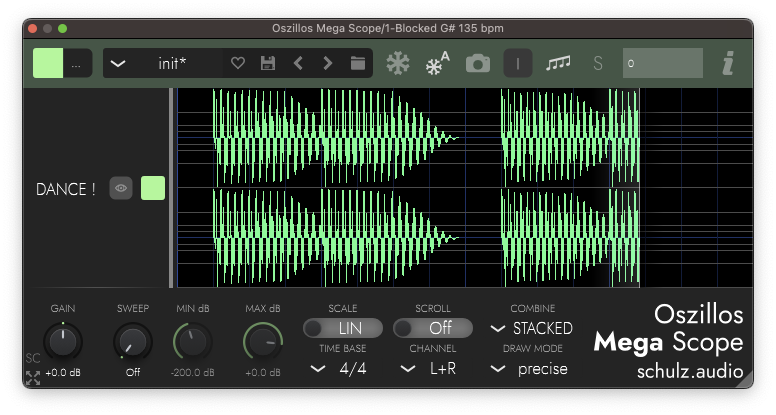
8. Naming, coloring, and re-ordering tracks
Since version 1.11, Oszillos Mega Scope allows renaming, coloring, and re-ordering tracks within the plugin display.
If your DAW supports reporting of track names and colors, those are copied as default.
You can rename and recolor tracks from the side panel on the left of the plugin window.

If the DAW project only has one instance of Oszillos, this customization panel is hidden. It is revealed by hovering and dragging the far right edge of the plugin window.
The size of the panel can be changed at any time by dragging its edge.
Naming Tracks
Double-Click on the track name text to open the renaming dialogue.
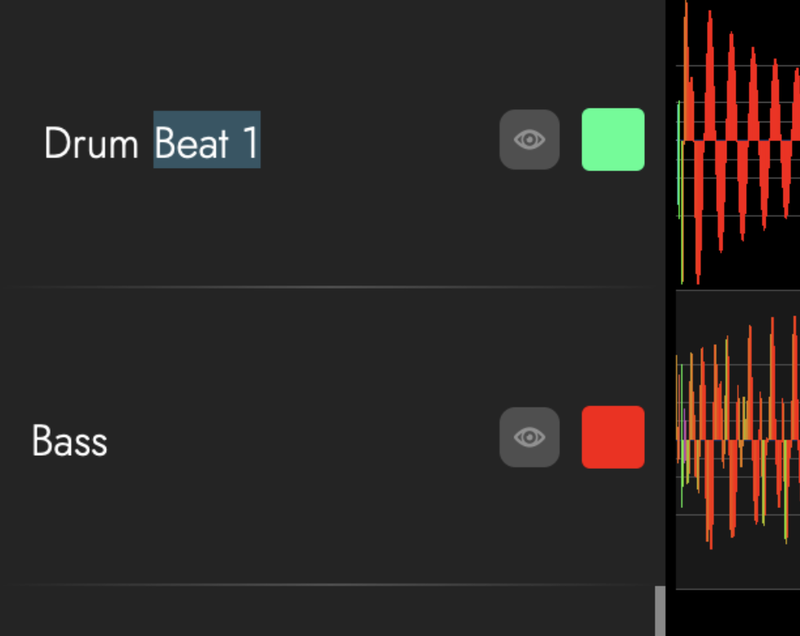
Re-ordering Tracks
Change the order of tracks by dragging and dropping them in the desired place.
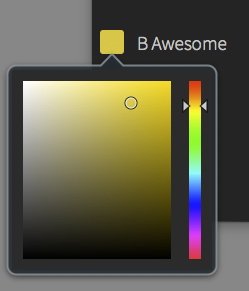
Coloring Tracks
Change the color of any track by clicking the color square on the left panel. Select a new color from the pop-up color window.
The waveform that corresponds to the current plugin instance is indicated by a grey vertical bar at the right edge of the name and color panel.
Pro-Tip:
If you give a track within your DAW a custom name, and you want Oszillos Mega Scope to use the new name of DAW Track - change the name within the plugin to a single space.
Now Oszillos will copy the name from the DAW to the plugin, after reporting. (Usually after changing the track name or after re-loading the session.)
9. Hiding Tracks

Since version 1.12. it is possible to hide individual tracks.
Each instance of Oszillos stores the information on hidden tracks separately, rather than sharing it across all instances of the plugin.
This makes it possible to have different views set up in different instances. So you could have one plugin that only shows the drum stems, then another that compares the keyboards with the vocals, etc. You can configure it as you please.
10. Grouping Tracks
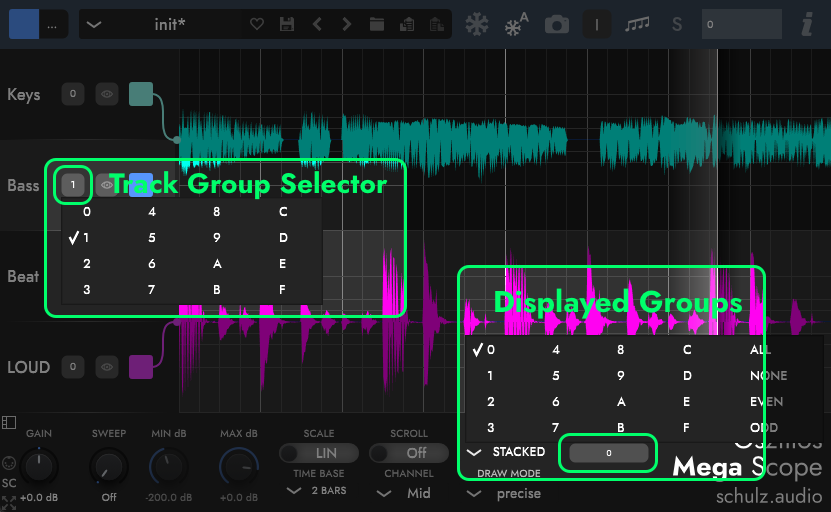
Since version 25.1.5 Oszillos Mega Scope supports grouping tracks.
The operation is rather simple: On each track you can select which group number it belongs to. In the group display selector you can select the groups you want to display.
Also note the indicators which show which track panel belongs to which waveform. This makes reading the display when tracks are hidden much easier !
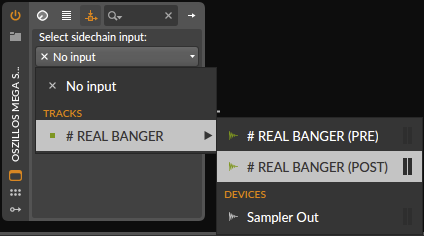
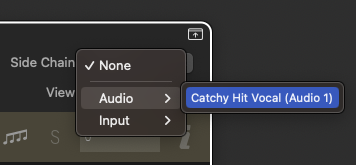
11. Side Chain Input
Since version 1.23.2431, Oszillos Mega Scope has a side-chain input. This can be useful for inspecting signals in more complicated latency compensation situations or for just quickly inspecting a signal without having to create another instance. In order to visualise a side-chain signal, follow the following steps:
- Select the side-chain input on the Oszillos Mega Scope instance in your DAW
- enable side-chain display by clicking the "SC" button at the bottom left corner
Step 1 depends on the DAW, here are some examples:
Ableton Live:

BitWig Studio:
Logic Pro:
The latency compensation settings apply to the side-chain as well as the main input of the plug-in instance because the DAW should take care of aligning the two. While the main input and the side-chain should be aligned to each other, they may still be shifted to the DAWs time-line and require manual latency compensation.
13. Presets
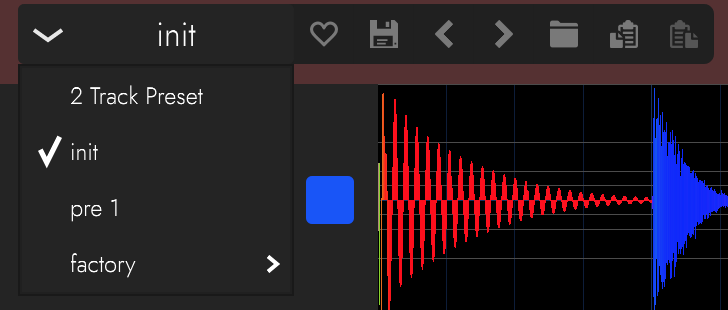
The preset manager allows you to save and recall custom patches.
You can use slashes " / " to organize presets into subfolders. For example "MyPresets/Cowbell/Phattness".
If you use the same name as a factory preset, yours will overwrite it.
Simply type the name, and hit the save icon.
(There are currently no factory presets.)
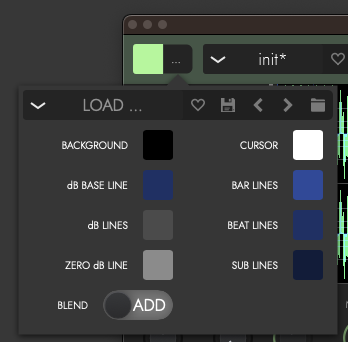
14. Color Selector

This setting in the top bar changes the current instance’s waveform color.
To change the color of a different waveform, simply click the colour selector in the side panel for this track.
You will notice that the color of the top bar changes slightly, this helps to identify which instance of the plugin you are working on.
17. Draw Mode Selector
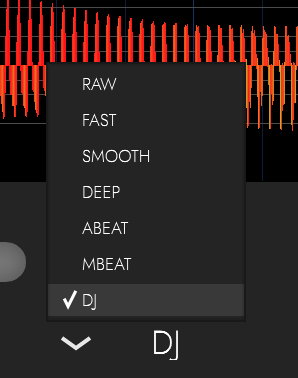
Oszillos Mega Scope implements six different waveform drawing modes. Each mode provides a different style of visual representation of the audio signal.
‘Mbeat’ and ‘Abeat’ are the two main modes.
These modes display information for both the frequency and amplitude of the audio flowing through the Oszillos Mega Scope Plugin.
The image coloring is implemented the following way:
- The input signal is split into three bands via a three-band EQ.
- The resulting three signals are used as RGB colors.
The color selector acts slightly differently in these modes, and helps to get a custom display for your waveforms:
- The Hue is used to hue-shift the RGB color
- The Brightness value changes the shade.
E.G. If you want your lows to be red and your highs to be blue, select a grey tone.
19. Channel
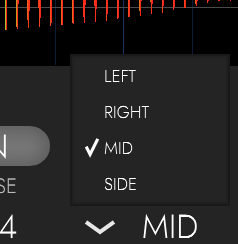
Oszillos allows you to configure the stereo monitoring of the plugin.
You can use the channel selector to change how the plugin interprets stereo information.
L = Left
R = Right
L+R = Left & Right (Since 1.23.2431)
M = Mid
S = Sides
M+S = Mid & Side (Since 1.23.2431)
The Mid and Side settings are computed from the left and right channels.
The Mid Channel is half the sum of left and right (i.e. the average) computed as follows:
M = 0.5*(L+R) This mode is the default because it gives an intuitive representation of both channels. It's basically a mono downmix.
The Side Channel is half of the difference between the left and right channels:
S = 0.5*(L-R) - This only contains the information that is different between the two sides. The side channel of a mono signal is empty.
Since 1.23.2431 Oszillos Mega Scope can display two channels per instance at once if you select the L+R or M+S modes. Please note, that you need to select a matching mode in the other instances as well or only the first channel will be displayed. This is in order to preserve CPU when display of only once channel is needed.
20. Gain
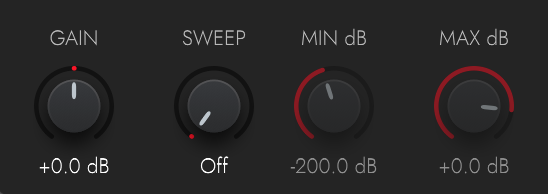
If your audio signals are too quiet, use this gain control to boost them.
The same amount of gain is applied to each channel. Use this control to get the levels to the ‘Sweet Spot’ - where you can see as much detail as possible without boosting it too high.
Use the high and low decibel values to set the analysis limits in more detail.
21. Logarithmic (Decibel) Scale

To toggle between linear and logarithmic display modes, simply click the button labeled "lin" / "lg" respectively.
This provides two knobs to adjust the minimum and maximum decibel amounts displayed so you can zoom in on the range you're interested in.
The grid also adjusts to the scale, ensuring the display info remains accurate.
22. Draw Waves ...
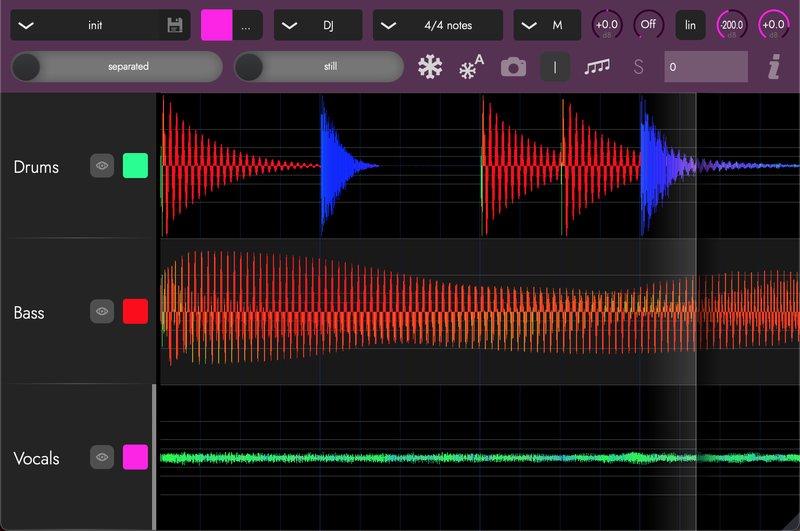
Oszillos Mega Scope can show the waves Separate (stacked), Combined (overlaid) or Sum:
Combined (Overlaid)

Note: Since version 1.23.2431 you can select additive blending in the colour settings for cleaner display of this mode. This mode of course also works
Separate (stacked):
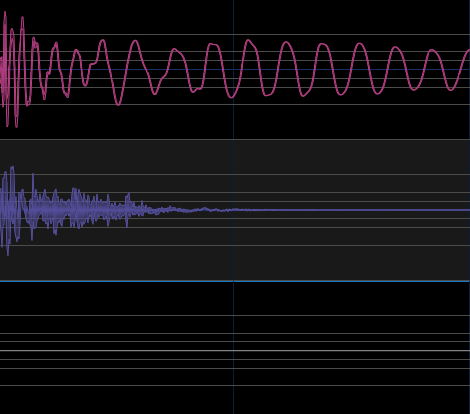
Sum:
This mode was introduced in version 1.22. It allows you to show a sum of all the instances. This is useful for investigating phase issues and especially useful when used in conjunction with a side-chain input.

24. Freeze

This toggle button allows you to freeze the display. This stops the display from updating, so you can look at waveforms in-depth with no time constraints.
The snow-crystal with the small "A" enables auto-freeze. When enabled, the display will automatically freeze when DAW playback stops and unfreeze when playback continues. Auto-Freeze is enabled by default. Note that you also may need to disable Freeze when disabling auto-freeze while your DAW is paused.


28. Latency Compensation

Introduced in Oszillos V1.12, the plugin now includes a latency compensation setting, so you can correct timing synchronization issues.
Some DAWs (including Ableton Live) do not report correct track timing information to plug-ins if there are latency-causing plugins inserted before them.
In this case, users need to enter the latency time caused by preceding plugins into the text box at the top left of the Oszillos plugin window.
For example, if you have the following signal chain:
[OMS1] > [Plugin] > [OMS2] >
If the [Plugin] creates a latency of 1024, then you would enter “-1024” in [OMS2]’s delay compensation text. This compensates for the delay caused by the plugin and ensures the two Oszillos instances are synchronized.
If there are multiple plugins in the chain, you will need to add all their latency times together and use the total for the compensation value.
Note: the latency entered is in samples!
New since 1.23.2404: if you end your input with "ms", the entered amount will be automatically converted from milliseconds into samples according to the current sample rate. Example: enter "-10 ms" and it will be converted to -441 if you sample rate is 44.1 kHz.
29. Semi-Automatic Latency Compensation
Introduced in 1.23.2403
Oszillos Mega Scope’s latency compensation feature helps you to get a sample-accurate reading of all the audio signals in your project. To use it, you will need to send a MIDI note to each instance of the plugin to trigger the latency measurement.
1. Enable the MIDI Trigger
First, you need to enable the MIDI trigger on each instance of Oszillos Mega Scope. Click the MIDI icon in the bottom left corner of the plug-in to activate it. The icon will light up when it is active.
2. Create MIDI Trigger
To keep all your Oszillos Mega Scope instances continuously synced, we recommend using a dedicated MIDI track. In Ableton Live, you can use an Instrument Rack with multiple chains of the "External Instrument" device.
- Create a new MIDI track.
- Add an Instrument Rack to this track.
- Inside the Instrument Rack, create a chain for each instance of Oszillos Mega Scope in your project.
- On each chain, add an "External Instrument" device.
- In each "External Instrument" device, select the Oszillos Mega Scope instance for that chain from the "MIDI To" dropdown menu.
- Create a MIDI clip on this track with a single note at the beginning of each bar.
This setup will automatically send a MIDI trigger to all your Oszillos Mega Scope instances at the start of each bar, keeping them all perfectly in sync, even if you add more latency-inducing plug-ins to your project.

3. Fine-tuning
You may want to stop the MIDI clip to prevent continuously re-syncing the Oszillos Mega Scope instances. You can do this by simply deactivating the MIDI clip in your DAW.
By following these steps, you can ensure that your Oszillos Mega Scope is always giving you a precise and latency-compensated view of your audio.
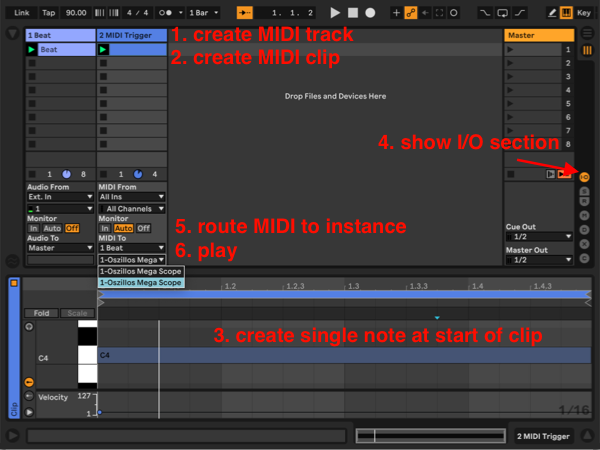
Important: Once you've sent the trigger to all instances, make sure to deactivate the MIDI output of the track containing the trigger note. Also if you change your sample rate, track delay or add or remove plug-ins which require latency compensation you may have to re-send the trigger to all instances.
30. Latency detection & Track Delay
The procedure outlined above only works correctly when you're not using "Track Delay". If you're using Track Delay, you must delay the MIDI track by the lowest delay amount of all tracks.
Example 1:

Enter "3.00" into the Track Delay field of the MIDI Channel which contains the trigger note because it's the lowest value of all tracks.
Example 2:

Enter "0.00" into the Track Delay field of the MIDI Channel which contains the trigger note because it's the lowest value of all tracks.
Example 2:

Enter "-5.00" into the Track Delay field of the MIDI Channel which contains the trigger note because it's the lowest value of all tracks.

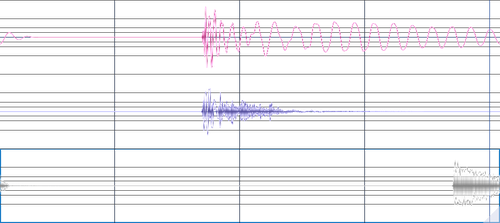
32. Mouse Drag Measuring
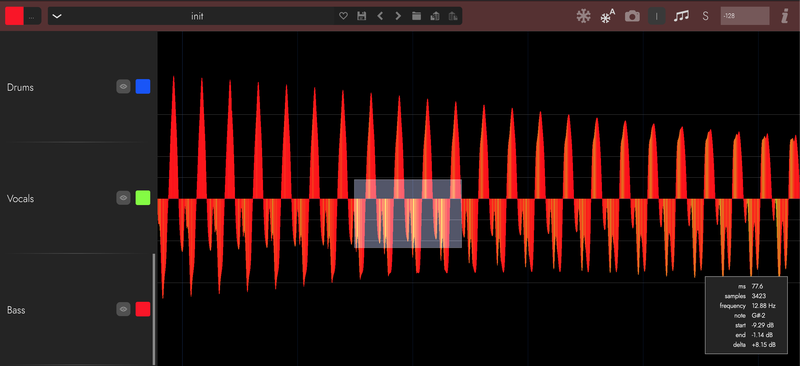
Right-Click and drag the display to highlight sections of the waveform.
This function gives you specific measurements of the selected audio segment.
A pop-up window will be displayed in the bottom right corner of the plugin and contains the measurement information.
Currently, this feature provides the following measurements:
- MS - Length of selection in milliseconds.
- Samples - Length of selection in samples.
- Frequency - The dominant frequency in Hz of the selected area.
- Note - The closest note to the selected frequencies.
- Amplitude - The loudest peak in decibels.
Difference - The difference in decibels between the loudest and quietest parts of the selection.
33. Conclusion
Thanks for reading this manual. You should now have a solid understanding of the features and settings of Oszillos Mega Scope.
We hope you enjoy using this plugin as much as we enjoyed making it.
If you have any questions, please feel free to contact me and ask away!