Schulz Tonebreaker Manual
Contents
1. Introduction
Schulz ToneBreaker recreates the character and response of a classic British blues overdrive, complete with speaker cabinet and room modeling for an authentic playing experience. It is available in all major plug-in formats as well as a standalone application.
The standalone version provides a quick way to dial in a warm, expressive guitar tone without opening a DAW—ideal for practice or quick sessions.
You can evaluate Schulz ToneBreaker free of charge for 14 days by clicking the Download button here.
After downloading, run the installer and follow the on-screen instructions.
Authentication is straightforward. Additional information on the process can be found here.
2. Overview
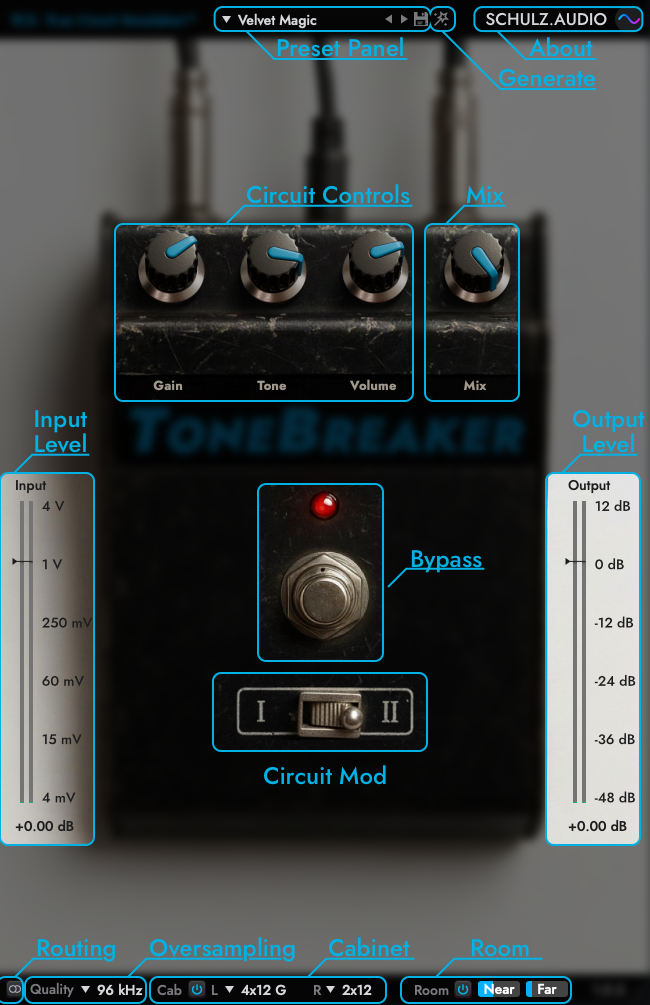
Preset Panel
The Preset Panel lets you load and store presets. Alt-Click the drop-down menu to access additional options such as Copy, Paste, and Browse.
You can replace the Init Preset with your own default setup by holding CMD+OPTION (Mac) or CTRL+ALT (Windows) while clicking the Save button.
An asterisk next to the preset name indicates that the preset has been modified. The Plug-In ships with a factory preset bank in various styles to get you started.
Generate
The magic wand icon creates an entirely new preset inspired by the style of the current factory preset. Instead of randomly selecting an existing one, it intelligently generates a fresh, unique sound — something truly original and never heard before.
About
Click the schulz.audio logo to open the About screen. This screen also includes an option to manage your license.
Circuit Controls
These knobs represent the potentiometers of the original hardware circuit. Adjust them to shape the sound to your preference.
Mix
The Mix control blends the unprocessed (dry) guitar signal with the processed one, enabling parallel processing. With higher distortion settings, mixing in some dry signal can produce tones reminiscent of a Klon-style overdrive.
Input Level
Displays the input signal level on a logarithmic decibel scale. For realistic results, aim for input levels between 150 mV and 300 mV.
Higher input levels will increase drive—similar to pushing the pedal harder with a clean boost. Both Drive and Input affect the circuit’s saturation; use them creatively. There are no fixed rules—if it sounds good, it’s right.
Output Levels
Controls the post-gain level, making it easier to match output volume with other signal sources.
Bypass
Bypasses the entire effect, including the cabinet and room simulations.
Circuit Mod
Selects between two popular circuit variants (mods). The difference lies primarily in gain structure and filter characteristics.
Routing
Switches between Mono and Dual (Stereo) processing.
For typical mono instruments such as guitar, use Mono mode to reduce CPU load.
For stereo sources, select Dual mode to preserve the stereo image.
Oversampling & Aliasing
ToneBreaker uses a detailed non-linear circuit simulation. Non-linearity adds harmonic content—new overtones that can extend beyond the current sample rate, which may cause aliasing.
In most cases, aliasing artefacts are inaudible, as they’re masked by the main signal or by other elements in a mix. If you’re working with high-frequency material (e.g. bright synths) and notice unwanted artefacts, increase the oversampling rate.
Higher oversampling reduces aliasing but increases CPU usage.
Cabinet Simulation
Enables or disables the speaker cabinet emulation. Choose from a selection of boutique cabinet models.
You can assign different cabinets to the left and right channels to create a wider, more natural stereo sound.
Room
Blends in room ambience captured from near and far microphone positions.
This adds air and depth, giving the sound a more natural recorded character.
3. Conclusion
Thanks for your interest in our Plug-Ins. If you encounter any problems or would like us to make other pedals or circuits available as Plug-Ins, please don't hesitate to drop us a line.
Happy Jamming,
-- Ben