OOMPH Manual
1. Graphics Engine
OOMPH uses and advanced graphics pipeline which requires a recent Graphics Card, Operating System and up-to-date drivers. You can test and select the graphics engine at the end of the installation. If you encounter any crashes, glitches or bad performance, please select the "Classic" Engine. The Choices are ordered how we think they should perform best.
If you want to change your selection, just run the installer again.
4. Compatibility
OOMPH is compatible with the following hosts and plugin formats:
Windows:
- Standalone
- 32-bit & 64-bit
- VST2, VST3, AAX.
macOS:
- Intel, M1 and M2 macs are supported
- Standalone
- VST2, VST3, AU, AAX.
DAWs:
- OOMPH is compatible with all hosts which support either VST2, VST3, AU or AAX. if you encounter an incompatible host, please contact us.
5. Installation Process
The plugin installer is downloaded from your Schulz Audio Account, at:
https://schulz.audio/license/list/
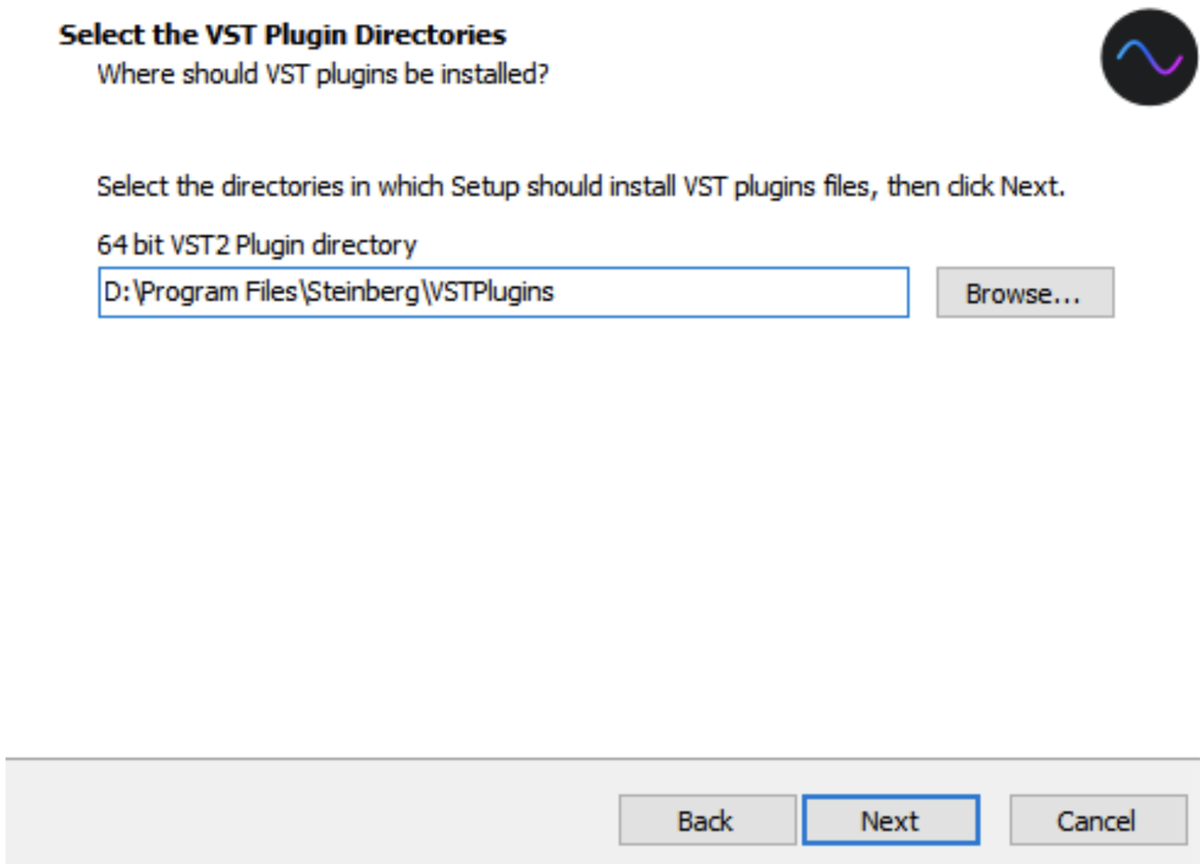
Windows Installation
- Download the relevant installer from the OOMPH page or via the button at the top.
- Run installer.exe.
- Select the default VST installation location, or specify a custom folder.
- Follow the instructions on the installer, and wait for it to complete.
- You will be prompted to authorize the plugin when you launch your DAW for the first time.
Mac Installation
- Download the relevant installer from the OOMPH page or via the button at the top.
- Run the installer.pkg
- Follow the installer's instructions.
- Choose the installation directory.
- You will be prompted to authorize the plugin when you launch your DAW for the first time.
Audio Unit, VST2, VST3, and AAX Plugins will be automatically installed in their corresponding native folders. Although, you can choose a custom folder destination during the installation process.
6. Authorization
You will be asked for authorization after opening the OOMPH plugin for the first time on a new computer.
Information about the authorization process can be found here > Schulz Audio License Management
7. Uninstallation
Follow these steps to uninstall the plugin
Windows Uninstallation
- Open the Windows Start Menu
- Open the Settings by clicking the cog icon
- Select Apps and Features
- Scroll down and select OOMPH
- Click ‘Uninstall’
Mac Uninstallation
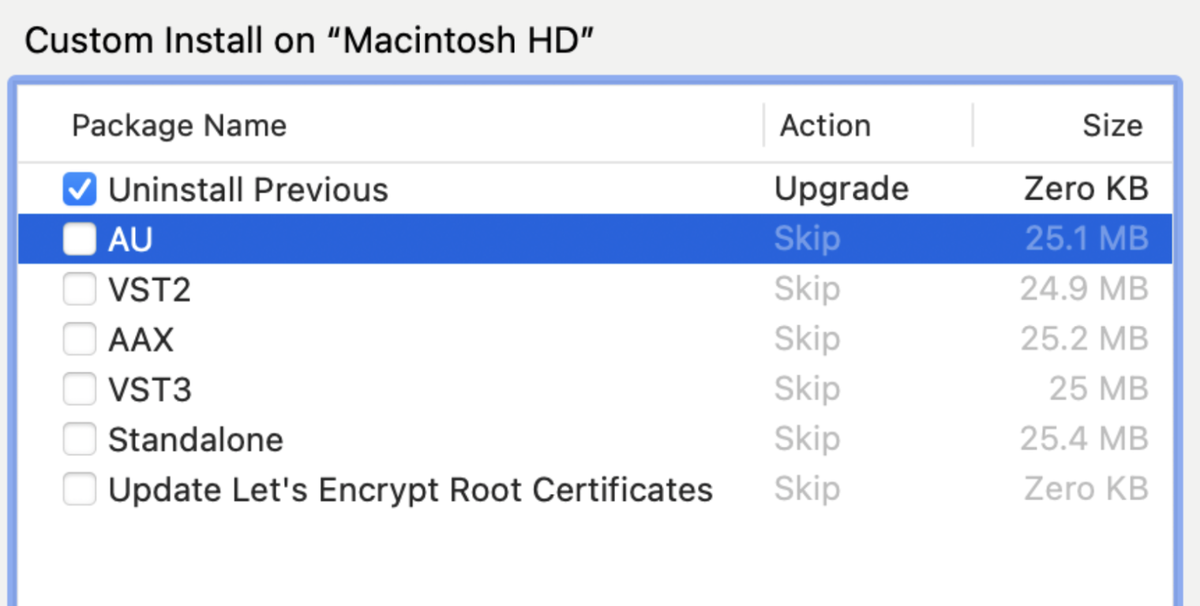
- Run the OOMPH plugin installer
- In the custom install section, uncheck everything except for ‘Uninstall Previous’
- Continue with the installation and the plugin will be removed
8. Using The OOMPH Plugin
This section explains how to use the OOMPH plugin, and runs through all the features.
Loading and Inserting the Plugin
The first thing you need to do is create an instance of this plugin in your DAW.
OOMPH can be inserted on any kind of audio or MIDI track.
- Locate OOMPH in your DAW’s plugin browser.
- Create an instance of the plugin on a track. The method may vary depending on which DAW you are using.
- Open the plugin window.
You will now be ready to process the incoming audio.
How OOMPH Works
OOMPH processes any audio running through the plugin. This is a multi-band processor. There are four separate bands, each with its own independent set of processing controls.
This lets you color and shape the sound of any audio across four independent bands.
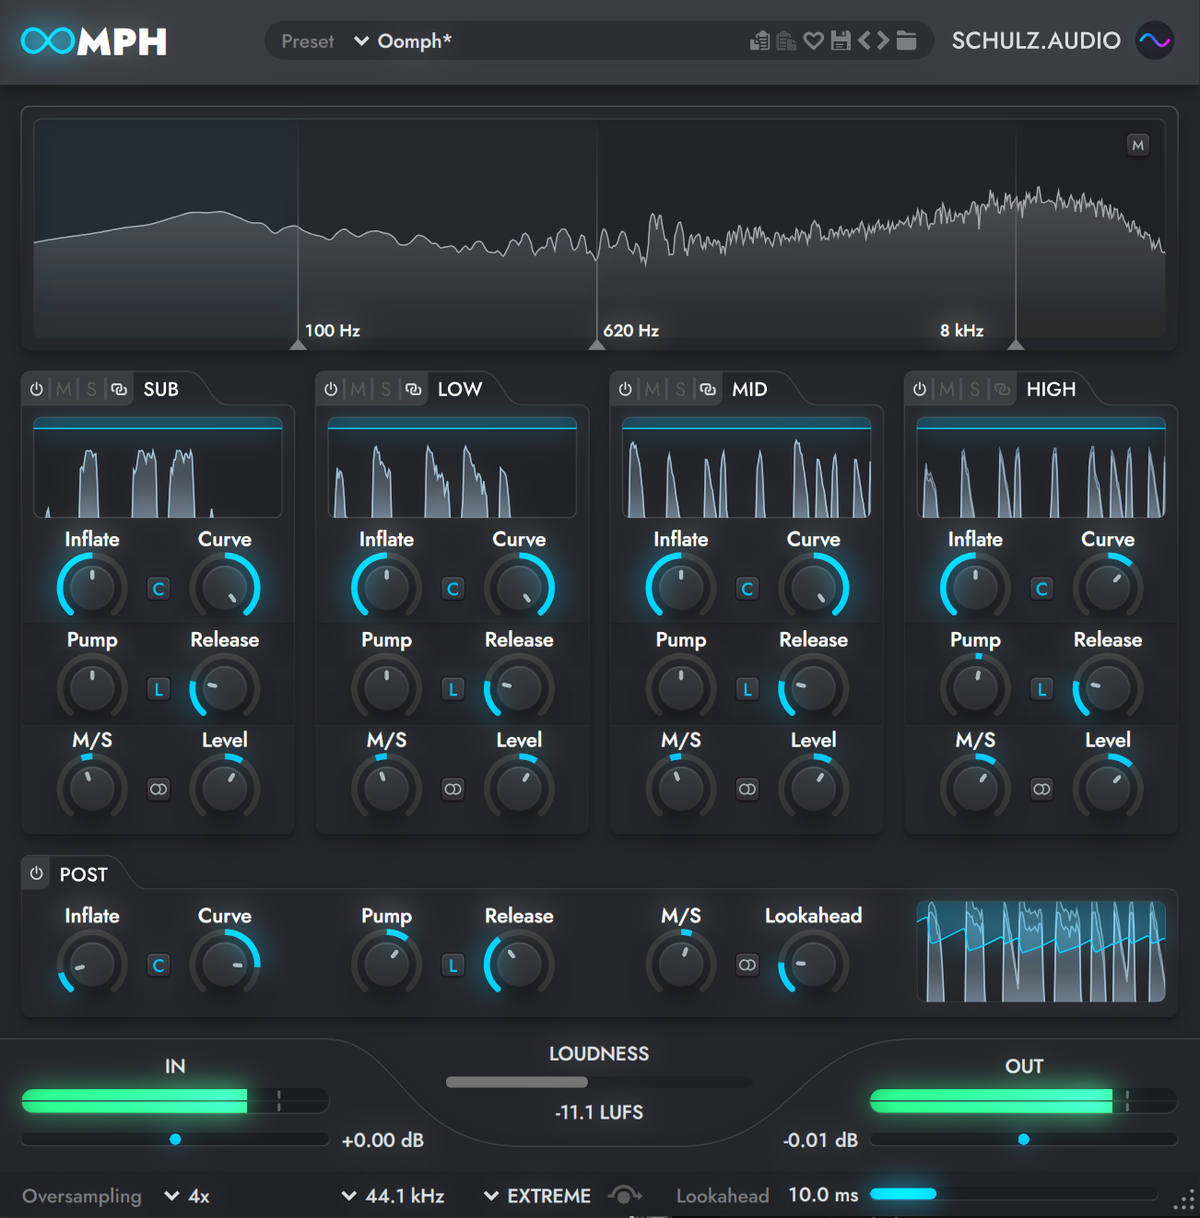
OOMPH Plugin Interface Overview
There are 6 main sections to the plugin interface
- Preset/Top Bar
- Frequency Window
- Processing Controls
- Post Processing Bar
- Master Gain & Metering
- Bottom Settings Bar
9. Preset/Top Bar

The top bar provides access to the preset manager and the licensing dialogue.
- Preset dropdown - this lets you load OOMPH presets from your preset folder.
- Copy Preset - Copies the current patch as a preset that can be pasted into another instance of OOMPH.
- Paste Preset - Pastes the copied preset to this instance of OOMPH.
- Favorite - Sets the preset as a favorite, adding it to the ‘Favorite’ preset dropdown menu.
- Save - Saves the current patch as a preset. You will be prompted to type in a name for the saved preset.
- Load Previous / Next Preset - These arrows let you quickly jump through your folder's next or previous presets.
- Open Preset Folder - This opens the preset folder location in your computer's file browser (Explorer/Finder). This makes it easy for you to back up, delete, transfer, and manage your presets.
- Schulz.Audio Logo - Click this to see information about the current version of the plugin, as well as open the License Manager
10. Frequency Window
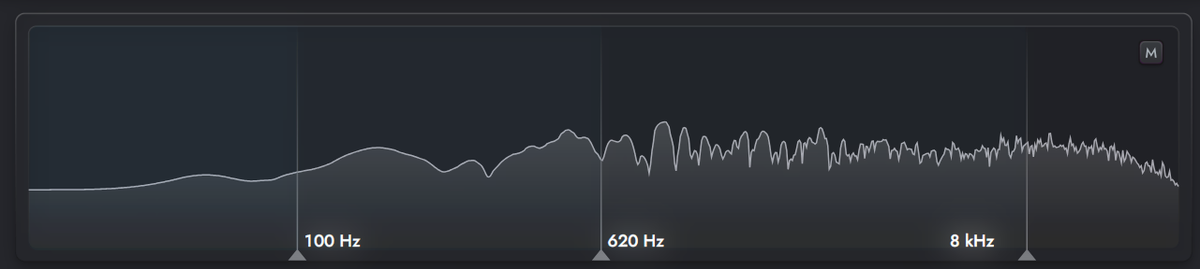
The frequency window serves two purposes:
- Displays the frequency content of the incoming audio signal.
- Lets you control the crossover points for the four independent bands of frequency processing.
There are four vertical lines, and each of these represents the frequency crossover between the four bands - Sub, Low, Mid, and High.
You can click and drag these lines to change the crossover frequency of each band.
This means you can target the specific areas of the sound you want with each processing band.
11. Processing Controls and Display

Each of the four bands provides an independent panel of controls. These all perform the same processes, however, they work independently across each frequency band.
- Solo & Mute - Solos the selected frequency band, muting the audio of all three other bands. This is useful if you want to hear what the processing is doing to a single chosen band - for example, if you only want to hear the sub frequencies.
- On/Off - Turns the processing section on or off for the chosen frequency bands.
- Link - Any bands that are linked will all be controlled simultaneously.
- Inflate - Sets the level of saturation applied to the band. Higher inflation levels create a louder, richer sound. Holding ALT while using this control automatically sets the band’s level to compensate for the added gain. You can use this to add color without changing the band's gain.
- Clipping Toggle - This enables or disables clipping in the saturation circuit. Having clipping enabled can create crunchier sounds, but can create unwanted artifacts when the signal is pushed.
- Curve - Changes the curve of the saturation circuit. Higher volumes create a brighter, more high-frequency sounding coloration, while lower values are more focused on the low frequencies.
- Pump - Using a clean, modern compressor, the pump control determines the amount of dynamic range for the band. Turning the pump control up creates a wider dynamic range, with more pronounced, ‘pumping’ transients. Turning the pump down creates a less dynamic, flattened sound.
- Limiter Toggle - Adjust the ratio of the dynamics processor. When off, the compressor’s ratio is set to 1:1, when on, the ratio is set to hard limiting.
- Release - Sets the release time for the Pump processor. Lower release times create snappier, faster-sounding compression, while longer release times create a more gentle effect.
- M/S - Controls the volume balance between the mid and side channels, essentially letting you change the stereo width of the band. A value of 0% creates a mono signal, while a value of 200% creates an extra wide stereo image. With the control at 100% the stereo image remains in its original state. Click the icon next to the control to choose how the control works.
- Level - Sets the gain of the band. This is useful for boosting, cutting, and balancing out frequency bands in your audio.
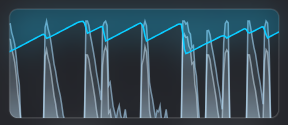
You can also see how each band is being processed with the smaller independent window, which shows the waveform for the band in real time. Each window shows the processing and waveform for its channel.
- The Light Blue line shows the level of Gain Reduction being applied to the signal.
- The paler, gray line shows the original signal level.
- The brighter white line shows the processed waveform.
12. Post Processing, and Master Gain
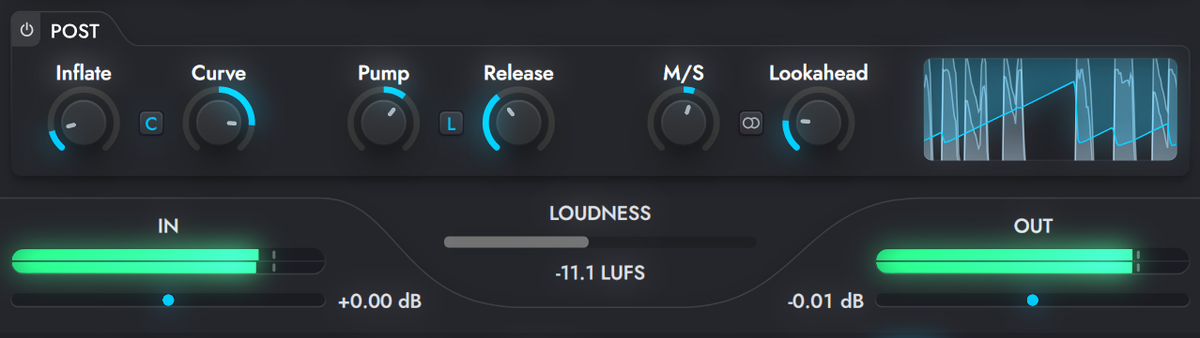
The Post Section lets you apply the OOMPH processing to the entire master output of the plugin, giving you a second sequential stage of OOMPH, and extra cohesiveness. All the controls work in the same way as described in the main control panel.
The Loudness/Mastering section gives you some useful metering, and master in/out gain for balancing the signal.
- IN - Provides peak dB metering control for increasing or reducing the input gain. Useful for setting the incoming signal’s level to around 0 dB or for driving the whole signal chain all at once. Hold down alt while adjusting to have the OUT slider move in the opposite direction when adjusting.
- Loudness - Displays the LUFS level of the outgoing signal. LUFS (Loudness Units Full Scale) is a standardised measurement unit that quantifies the perceived loudness level of audio content which is used when mastering audio. Different platforms and distributors have unique requirements for the LUFS of published audio.
- OUT - Provides peak dB metering of the output level and control for increasing or decreasing the output gain of the plugin. Hold alt to have the input level adjusted simultaneously.
Recommended LUFS for platforms:
- Spotify: -14 LUFS
- Soundcloud: no loudness normalisation
- Apple Music: -16 LUFS
- YouTube: -14 LUFS
- Amazon: -11 LUFS
- Beatport / DJ Stores: -6 to -9 LUFS
13. Settings Bar
The lower bar provides a few extra settings and actions.
- Oversampling - This increases the audio quality by increasing the oversampling algorithm. Higher oversampling multipliers results in increased audio quality, although it requires additional CPU power. 1x, 2x, etc. multiplies the current playback sample rate of your DAW with a fixed factor. HIGHER RATE uses either the DAWs playback sample rate or the rate set in the RATE dropdown - whichever is higher. HIGHER RATIO uses either the DAWs playback sample rate or an power-of-two integer (1x, 2x, 4x, etc.) multiple thereof to reach at least the rate set in RATE. This is useful when you want to enforce integer-multiple oversampling but also want to ensure that the processing is done with at least the specified sample-rate. FIXED RATE simply uses the value chosen in the RATE drop-down.
- Sample Rate - Sets the sample rate of the processing. Higher values create more detailed processing, which results in higher quality, although it requires more processing power.
- Processing Quality - Determines the level of audio processing quality. Higher values sound better but need more CPU.
- Soft Bypass - This toggles a bypass of the entire plugin, letting you switch between the processed, or original signal. This feature is intended for A/B comparisons. The processing will continue to run in the background. If You want to free up CPU resources, you have to disable the plug-in via your DAW.
- Lookahead - This lets you determine the amount of look-ahead of the built-in limiter sections. A longer lookahead creates more latency but gives the gain-reduction stage of the limiter some time to gently fade to the determined target level - which significantly decreases clicking and pops.
- Resize Handle - Change the size of the plugin window by clicking and dragging this handle. right-clicking shows pre-defined scaling factors as well as an option for saving the current window size as the users default.
14. Conclusion
If you have further questions, please don't hesitate to use the contact form to reach out - we're happy to help.